eBay Photo Size for UK Resellers: Nail the Main Photo, Batch the Rest

Table of Contents
- eBay image requirements at a glance
- When to use minimum, recommended, or larger images
- Export settings that balance quality and file size
- Aspect ratios and framing that make photos clearer
- How to make your images zoom ready
- How many photos to upload and how to order them
- Adding video and what eBay allows
- Common photo mistakes and quick fixes
- A workflow for sellers listing across several marketplaces
- Background and lighting that make photos look professional
- Editing your photos without breaking eBay’s rules
- Optimising photos for mobile and desktop buyers
- Naming your image files for a faster workflow
- What to get right first if you are short on time
- A faster way to keep listings and photos in sync
- FAQ
- Recommended
For eBay listings, photos need a minimum of 500 pixels on the longest side, though 1600 pixels is the recommended target for sharp, zoomable images. Files must be JPEG, TIFF, BMP, GIF or PNG and stay under 12MB each. Hit those numbers and your listing photos will display cleanly on both mobile and desktop.
TL;DR:
- Photos below roughly 800 pixels on the longest side pixelate when magnified, while 1600 pixels supports clearer inspection of wear, labels, and small defects.
- Make the first image a sharp, square full view; follow with alternate angles, detail and flaw shots, and one photo for each variation.
- Use JPEG with sRGB for most listings; convert TIFF or PNG files to JPEG when needed, since uncompressed files can exceed the upload limit.
- Crop, straighten, and correct brightness, but avoid misleading text, logos, or unauthorized stock photos; show the actual item for sale.
- Use video only when movement or function matters; eBay accepts MP4 or MOV clips up to 150MB and about one minute long.
eBay image requirements at a glance
Before you reshoot anything, check your current photos against eBay’s actual rules. Most listing problems come down to missing one of these baseline numbers rather than poor photography skills.
| Requirement | Specification |
|---|---|
| Minimum dimensions | 500 pixels on the longest side |
| Recommended dimensions | About 1600 x 1600 pixels |
| Maximum file size | 12MB per image |
| Accepted formats | JPEG, TIFF, BMP, GIF, PNG |
| Recommended aspect ratios | 1:1 (square) or 16:9 (widescreen) |
| Photos per listing | Up to 24, free of charge |
| Gallery Plus hover image | Up to 400 x 400 pixels, with magnifier and enlarge link |
| Video format | MP4 or MOV |
| Video size and length | Maximum 150MB, around one minute |
| Video resolution | Up to 1080p |
The main photo does double duty: it is the first image buyers see in the listing and it becomes the thumbnail in search results, so it carries more weight than any other image you upload. Gallery Plus, eBay’s paid upgrade, enlarges that thumbnail and adds a magnifying glass, which only works properly when the underlying photo is high resolution to begin with.
When to use minimum, recommended, or larger images
The 500 pixel minimum is a floor, not a target. An image at exactly 500 pixels will display, but it often looks soft once a buyer tries to inspect stitching, labels or surface wear, which matters most for clothing, electronics and collectables where condition drives the sale.
Once you cross 800 pixels on the longest side, zoom functionality becomes genuinely useful: buyers can magnify a section of the photo without it turning into a blur of pixels. That is the practical threshold for anything you expect people to scrutinise closely, such as a worn heel, a small chip or a fabric tag.
Around 1600 pixels is where most sellers should land as a default. It gives enough resolution for zoom to work well, keeps file sizes reasonable, and matches eBay’s own recommendation for best results. Shooting at this size also future-proofs your images if eBay ever increases its display sizes, since you are not stuck re-shooting stock.
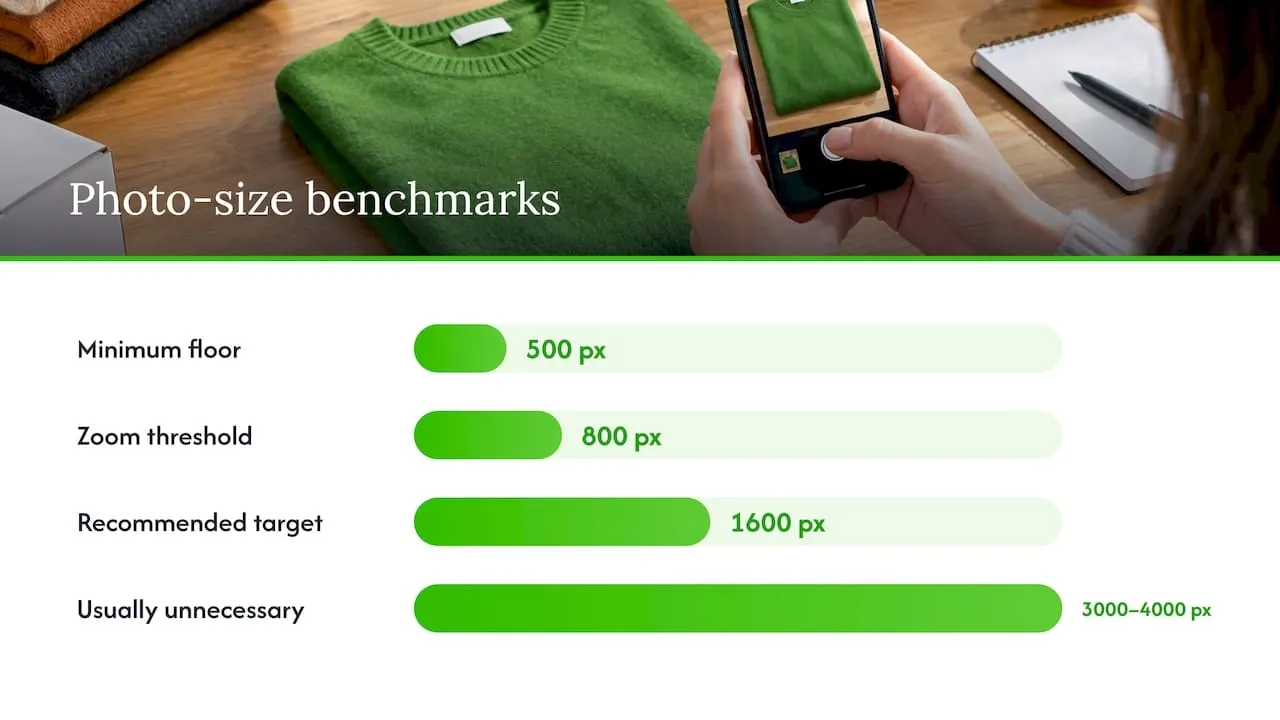
Going noticeably above 1600 pixels, into the 3000 or 4000 pixel range that many modern phone cameras capture by default, rarely adds value for a listing photo. The extra detail is invisible at typical screen sizes, the files take longer to upload, and you are more likely to bump against the 12MB cap, especially with uncompressed TIFF or PNG files. The one exception is when you plan to reuse the same master photo for a large-format print catalogue or a website banner outside eBay, in which case keeping an oversized original on file makes sense, provided you still export a resized copy for the actual listing.
Export settings that balance quality and file size
eBay accepts JPEG, TIFF, BMP, GIF and PNG, but JPEG with sRGB colour should be your default choice for almost every listing. It compresses well without visible quality loss at normal viewing sizes, and sRGB avoids the colour shifts that can happen when a camera or editor saves in a wider colour space that browsers render inconsistently.
The 12MB per file limit sounds generous, and for JPEG it almost always is. TIFF and PNG files are a different story: an uncompressed TIFF can easily exceed several megabytes, so if you shoot in those formats, convert to JPEG before uploading.
Resolution measured in pixels per inch (ppi) does not matter for web listings the way it does for print. A 1600 x 1600 pixel image looks identical on screen whether it is tagged at 72ppi or 300ppi, because ppi only affects physical print size. What determines how sharp your photo looks on a buyer’s screen is the pixel dimension, so stop worrying about ppi settings in your editor and focus on getting the pixel count right.
Aspect ratios and framing that make photos clearer
Square (1:1) and widescreen (16:9) are the two aspect ratios eBay commonly recommends for listing photos and search placements, and picking the right one for each shot makes a real difference to how clearly buyers can judge an item.
Square works best for most individual products: shoes, bags, folded clothing, electronics and small collectables all fit naturally into a 1:1 frame without wasted space. Widescreen suits items that are inherently long or wide, such as a full-length coat laid flat, a piece of furniture or a styled flat-lay showing an outfit, where cropping to square would force you to zoom out and lose detail.
A short composition checklist helps across both ratios:
- Fill the frame so the item takes up most of the shot, with minimal empty space around it.
- Use a neutral, uncluttered background so attention stays on the product.
- Include a scale reference, such as a ruler or a common object, for items where size is hard to judge from the photo alone.
- Shoot straight on rather than at an angle, unless the angle is specifically showing a feature like curvature or depth.
Pro Tip: Shoot your main photo in square format even if you plan wider shots later; it is the format most likely to display cleanly as a thumbnail across every placement eBay uses.
How to make your images zoom ready
Zoom only works well above certain pixel thresholds, so the dimension choices from earlier sections directly affect whether buyers can actually use this feature or just get a pixelated mess when they tap to magnify.
Anything below roughly 800 pixels on the longest side will pixelate noticeably when zoomed, which defeats the purpose of offering a close-up view at all. The 1600 pixel target gives a comfortable margin above that threshold, so magnification stays sharp even when a buyer zooms into a small detail like a fabric label or a scratch.
Gallery Plus, a paid Seller Hub upgrade, enlarges the hover thumbnail in search results to up to 400 x 400 pixels and adds a magnifying glass plus an enlarge link. It is worth considering for higher-value items where a bigger, clearer thumbnail in search results could influence a buyer’s click, but it only pays off when the source photo is sharp to begin with.
Before publishing, a quick check confirms an image will actually magnify well: view it at full size on your screen first. If it looks soft or blocky at that size, zoom will only make the problem more obvious to the buyer.
How many photos to upload and how to order them
eBay allows up to 24 photos per listing at no extra cost, and using a good number of them, rather than the bare minimum, genuinely helps buyers decide with confidence.
A sensible order for most listings:
- Main photo: the clearest, best-lit shot of the whole item, since this becomes the search thumbnail.
- Full view from a second angle, such as the back of a garment or the reverse of an electronic item.
- Close-up detail shots of texture, material, branding or key features.
- Honest shots of any flaws, wear or damage, clearly labelled where relevant.
- Accessories, packaging or anything else included in the sale.
For variation listings, such as the same T-shirt in three colours, include at least one photo per variant so buyers can see exactly what they are choosing. Keep your image order consistent across similar listings; buyers who shop your other items start to recognise the pattern, which builds trust in repeat visits to your shop.
Adding video and what eBay allows
Video is optional but can lift conversion on items where movement, function or authenticity are hard to show in a still photo. eBay supports MP4 or MOV files, capped at 150MB and around one minute in length, with a maximum upload resolution of 1080p.
Videos appear in the listing’s image gallery, and Seller Hub guidance on uploads applies the same way it does to photos, so there is no separate upload process to learn. They display in the app and mobile browser alongside your photo set rather than replacing it.
Video earns its place on listings where a still photo genuinely cannot do the job: a mechanical watch’s second hand sweeping, a zip or clasp opening smoothly, a speaker producing sound, or stitching flexing on a worn shoe. For a plain flat-lay of folded clothing, a sharp photo set usually tells buyers everything they need, so video is not worth the extra filming time on every listing.
Common photo mistakes and quick fixes
A handful of recurring problems account for most weak listing photos, and each has a fast fix:
- Blurry images: reshoot with more light or a tripod rather than relying on a phone’s low-light mode, which often softens detail.
- Cluttered or distracting backgrounds: use in-app editing to crop tighter, or retake the shot against a plain wall or sheet.
- Over-compressed files: avoid saving at very low JPEG quality settings just to shrink file size; reduce pixel dimensions instead if you are close to the 12MB cap.
- Inconsistent lighting across a photo set: shoot the whole set in one session under the same light source so colours and brightness match across all 24 slots.
- Misleading or added text on images: eBay’s images, videos and text policy warns against watermarks, added logos and unauthorised third-party photos, so stick to your own unedited shots.
A workflow for sellers listing across several marketplaces
Shooting photos once and reusing them properly saves far more time than editing each marketplace’s images from scratch. A practical approach is to build a master set per item, six to twelve shots covering the main angle, full view, several detail crops and a scale reference, then export two standard sizes from that set: 1600 pixels for your primary listing platform and 800 pixels for anywhere a smaller file is preferable.
Naming each master file with a SKU-friendly convention, covered in more detail further down, keeps the batch-export step quick even across dozens of items.
For sellers who list the same item across multiple platforms, we built Ruit around that exact workflow: list an item once on Vinted, eBay, Wallapop, todocoleccion, Shopify, WooCommerce and PrestaShop, and when it sells on one channel, stock syncs and the sold item disappears from the others automatically. We also handle auto-relist on Vinted and Wallapop and bring Vinted and Wallapop buyer messages into a single inbox, so a consistent photo set does more work across every channel rather than getting rebuilt for each one.
Background and lighting that make photos look professional
Lighting and background do more to lift photo quality than any camera upgrade. Natural daylight from a window, ideally indirect rather than direct sun, gives the most even, true-to-colour results, and shooting near a large window at midday or early afternoon avoids the orange cast of evening light.
A plain, neutral background, such as a white sheet, a grey wall or a plain table, removes distraction and lets the item’s actual colour and texture read correctly. Seller Centre best-practice guidance recommends photographing each item individually against a neutral backdrop, since cluttered or patterned backgrounds make it harder for buyers to judge condition and can even confuse search algorithms that try to identify the product in the image.
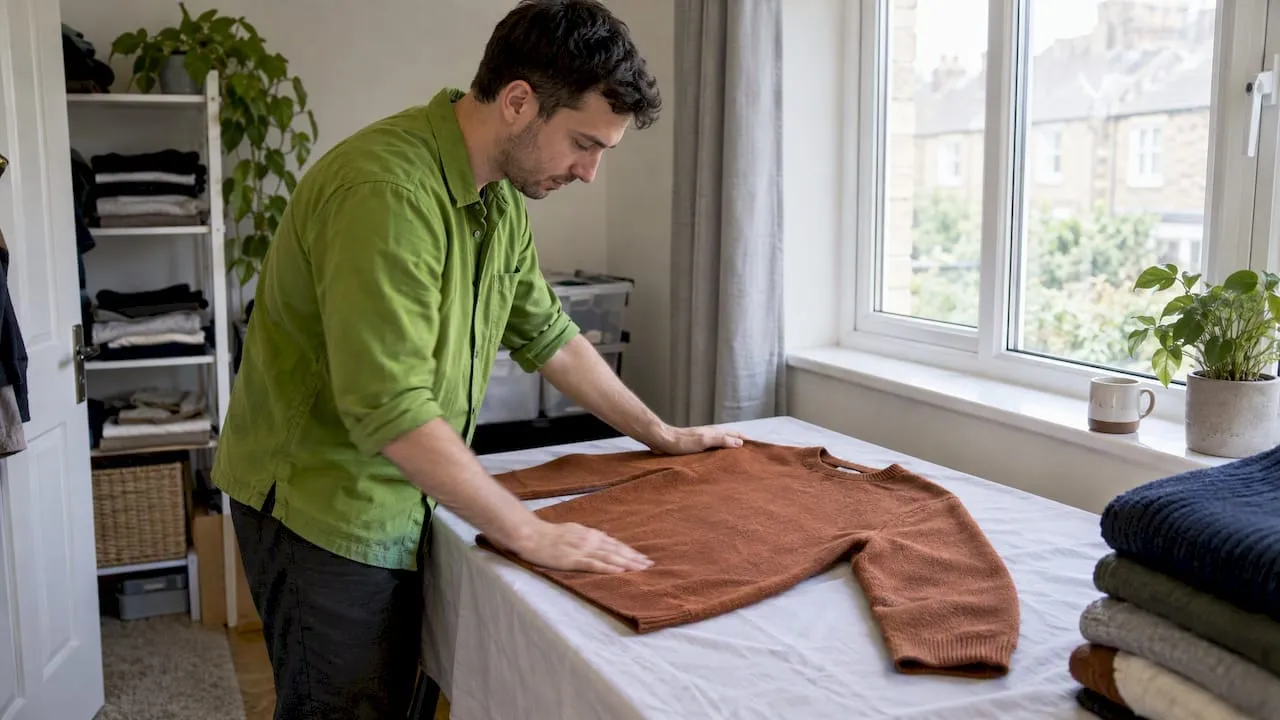
Avoid mixing light sources, such as a lamp plus a window, since different colour temperatures in one shot cause odd colour casts that are hard to correct afterwards. If natural light is not available, a simple LED panel with a diffuser gives consistent, repeatable results across a whole photo session, which matters more than the panel’s price tag. Shadows deserve attention too: a single strong shadow across the item can hide damage or make colour look uneven, so diffuse the light source with a sheer curtain or a dedicated diffuser rather than shooting under a bare bulb.
Editing your photos without breaking eBay’s rules
Light editing improves clarity without misleading buyers, and eBay’s own policy draws a reasonably clear line on what is acceptable. Cropping to remove excess background, adjusting brightness and contrast to correct for poor lighting, and straightening a tilted shot are all standard, sensible edits that most sellers should be doing as a matter of course.
What is not acceptable, under eBay’s images, videos and text policy, is adding text or logos that mislead buyers, or using photos you did not take yourself without authorisation. That rules out pulling a manufacturer’s stock photo instead of shooting the actual item you are selling, even when the stock photo looks better.
eBay’s own seller centre has also rolled out native editing tools including background removal and AI enhancement, which let sellers tidy up images without separate software. These work well for quick fixes like swapping a messy background for a plain one, but they are no substitute for shooting a sharp, well-lit original photo in the first place: editing can polish a decent shot, not rescue a genuinely bad one.
Optimising photos for mobile and desktop buyers
A large share of eBay browsing happens on a phone screen, which means your photos need to hold up at a much smaller display size than you might be judging them at on a desktop monitor. A detail that reads clearly on a 27-inch screen can disappear entirely when shrunk to a phone’s gallery thumbnail.
Test your main photo at a small size before publishing, not just full screen, since that is closer to how most buyers will actually see it on their first scroll past your listing. Strong contrast between the item and its background matters more on mobile, where subtle colour differences are harder to pick out on a smaller, often sun-glared screen.
Desktop viewing rewards detail: buyers on a bigger screen are more likely to zoom in and study a close-up crop, so it is worth keeping at least a few genuinely high-resolution detail shots in your set even if your main photo is optimised for a quick mobile glance. The 1600 pixel recommendation covers both cases well, since it holds up at small mobile sizes and still has enough resolution for desktop zoom.
Naming your image files for a faster workflow
A consistent file naming convention saves real time once you are managing photos across more than a handful of listings, even though eBay itself does not require any particular naming format for upload.
A SKU-based pattern works well: something like itemcode-angle-number, for example SKU1023-main-01, SKU1023-detail-02, and so on. This keeps your master photo folder searchable and makes batch exporting straightforward, since you can sort and select files by item rather than hunting through a folder of generically named photos like IMG_4821.jpg.
For sellers cross-listing the same item across several marketplaces, this naming habit pays off twice: it speeds up your own file management, and it makes it obvious at a glance which exported size (1600 pixel master versus 800 pixel secondary) belongs to which upload, reducing the chance of accidentally uploading a low-resolution crop as your main photo.
What to get right first if you are short on time
If you only fix one thing this week, fix the main photo: correct exposure, in focus, square format, neutral background. That single image influences more clicks than the other twenty-three combined, since it is the only one most buyers see before deciding whether to open the listing at all.
Good lighting and sensible framing beat expensive camera gear every time. A phone shot near a window at midday will usually outperform a cluttered shot taken with a far pricier camera under bad light.
Batch editing or outsourcing starts to make sense once you are listing dozens of items a week and the time spent per photo genuinely adds up; below that volume, a consistent personal routine is faster to set up than any outsourced process, especially if you source your inventory through a trusted used goods wholesaler.
- Luis
A faster way to keep listings and photos in sync
Shooting a good photo set is half the job. The other half is getting those images, and the listing details that go with them, onto every marketplace where your buyers actually shop, without re-typing each one by hand.
We built Ruit so you can list an item once and have it published on Vinted, eBay, Wallapop, todocoleccion, Shopify, WooCommerce and PrestaShop in one pass. When it sells on any one of those channels, stock updates and the sold item comes down from the others automatically, so you never risk selling the same item twice. We also auto-relist on Vinted and Wallapop, bring Vinted and Wallapop buyer messages into a single inbox, and draft listing titles and descriptions with AI, so the time you saved on photos goes further still.
If you are cross-listing across more than one or two marketplaces already, check our pricing and see which plan fits your volume.
FAQ
What size is an eBay profile photo?
eBay does not publish a distinct dimension specification for profile photos the way it does for listing images. A square image of at least a few hundred pixels per side displays cleanly in the small circular profile slot, so any reasonably sized, clear headshot or logo works without special resizing.
How do I change package size on eBay?
Package size is set during listing creation or editing, under the shipping details section, where you choose a package type and enter dimensions and weight for postage calculation. This setting is separate from photo dimensions and does not affect how your listing images display.
How do I add photos to an eBay listing from my iPhone?
Open the eBay app, start or edit a listing, and tap the photo icon to choose images directly from your iPhone’s camera roll or take new ones on the spot. You can add up to 24 photos per listing and reorder them after upload by dragging thumbnails into place.
How many images does eBay allow?
eBay allows up to 24 photos per listing at no extra charge, with the first image set as the main photo shown in search results. Using several angles and close-ups within that limit typically gives buyers more confidence than listing with only one or two images.
What is the minimum and recommended photo size for eBay?
The minimum is 500 pixels on the longest side, while eBay recommends around 1600 x 1600 pixels for sharper display and reliable zoom. Files must also stay under 12MB each in JPEG, TIFF, BMP, GIF or PNG format.